Using a manufacturer independent tooling can have good impacts on autonomy, learning experience and realization on what really works for an engineer regarding the whole embedded development process. I wanted to look for a complete setup working natively in Windows, yet as much as possible open source, to have a manufacturer independent tooling.
I will try to present it in an article I wished to have available when I started, hopefully letting you avoid the process of cherry picking infos from different tutorials. I’ll address also the small quirks and issues I faced in order to have everything working smoothly and in a scalable way. And where relevant, links to a more complete resources are given.
So in this article I will walk you through:
- Installing the necessary tools
- Setting up an extremely minimal firmware for an STM32 ARM microcontroller
- Debugging in Windows using native and updated software
Also I must aknowledge this article series from MCU On Eclipse that gave me a huge help in starting out the foundations to tailor the final solutions described in here.
First things first, install your tools
The tools selection is justified by using ideally the most supported solutions to achieve such a development setup. There are also quasi de facto standards are VSCode, CMake, Make, ARM GCC, and OpenOCD with the ARM GDB, so these will be the tools used in this article. Below are schematized our set of tools needed, going all the way down from source code to hardware!

So let’s begin!
The editor: VSCode
In this scenario we are going to use VSCode, hence the conventional installation holds with no problem as this is native on Windows. Download the binaries from the official website and after installing them, you are good to go.
Writing makefiles using CMake

To compose our makefile we are going to use the power of CMake. To install it correctly there should be no issues, as can be downloaded from their website.
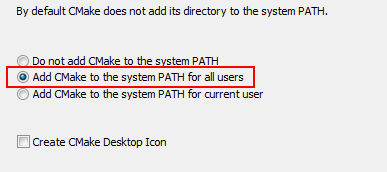
Make just sure you’ll add CMake in the system path as following:
The advantage to use CMake, once is setup, is that is very scalable for different projects, and is ready for more modern alternatives to Make, like Ninja (not covered in this article).
The king compiler, ARM GCC

To install the main component of this setup, today ARM simplified a lot for us, providing an installer which include all the tools, including the GDB tools on top of all sort of tools and other compilers for different platforms. Normally Google is your friend, but for reference it can be found in here. Make sure do download the AArch32 bare-metal target (arm-none-eabi) for this example.
Also here, make sure to have it in the system path:

For reference, the environment variable set in this case is C:\Program Files (x86)\Arm GNU Toolchain arm-none-eabi\13.2 Rel1\bin, and versions or personal options on where to install might vary.
Finally reading the makefiles with Make

Now we have a compiler, an editor to write code and run commands, and a tool to build a makefile. We need now –the- tool capable to read such a makefile and correctly interface with the compiler. In the open source world, this tool is GNU Make (among others more moderns/faster, like Ninja).
The tricky thing in Windows is that since it is a native open source tool for Linux, gets compiled and installed from the official Linux based sources, while in Windows the habit is to download and install a pre-compiled binary. Therefore, since from my limited experience in application software, in Windows is trickier doing this with Linux based sources, a binary is provided by different package managers and/or more or less official sources, which already did the work for us. Here a list where and how you can get it. Obviously, you just need to follow one of these alternatives.
Alternative 1: Winget
It is the most official package manager since it is maintained by Microsoft itself. But you might not get the latest version. To install this package manager if not already present in your Windows edition, and to install Make, just follow the official page.
Alternative 2: Precompiled packages
The one available, are an official, but outdated GnuWin32 project, available here.
Also in this case the make path must be inserted in the environmental variables of Windows, inserting the installation path in “Path”:

Alternative 3: MinGW
This is the entire GCC environment ported on Windows, which includes obviously also Make. It can be taken from the Winlibs project. Follow the latest revision, i.e. “GCC 13.2.0 (with POSIX threads)“.
Here is just needed to unpack the content in our desired folder, i.e. “C:\gcc\13.2.0”. Then we must add our binaries to the Windows system path:

Alternative 4: Other package managers, Chocolatey
This is another famous and well maintaned package manager. With this you need to follow the first installation procedure listed here.
Then install make by running the Power Shell in admin mode, then type choco install make
Fun fact: in here the environment variables are not needed to be set, yet you might want to know that Chocolatey puts the binaries in C:\ProgramData\chocolatey\lib.
The final piece, OpenOCD
This is another of those tools available either from sources or from a bunch of package distributors. Here also I’ve found couple of alterntives.
Alternative 1: I’ve initially followed this guide from MCU On Eclipse, but it requires to install node.js and and the xpm package distributor, which I don’t find myself using too much. But the project is well maintained and can be used.
Alternative 2: Using Chocolatey again! After being sure is installed by follow the instructions listed before, just run choco install openocd with Power Shell in admin mode and you are set.
Development environment setup (hardware and software tools)
Finally! All is installed and we are ready to setup a VSCode based project. Let’s open VSCode and install the plugins needed to setup the debugging environment, we will create a new project called aleaengineering_arm_makefiles_article (at least this is how is called in the downloadable example).
The hardware
We are going to use the “BluePill”, an STM32F103C8T based development board. It will be coupled with a ST-Link programmer. An official one like the V2 can also be used and is the revision which this article was tested with. The V3 is actually the last one, but I personally didn’t test it. To be precise, in the article is used a clone of the V2, but given how inexpesinve programmers have become, personally won’t make sense to buy clones anymore.
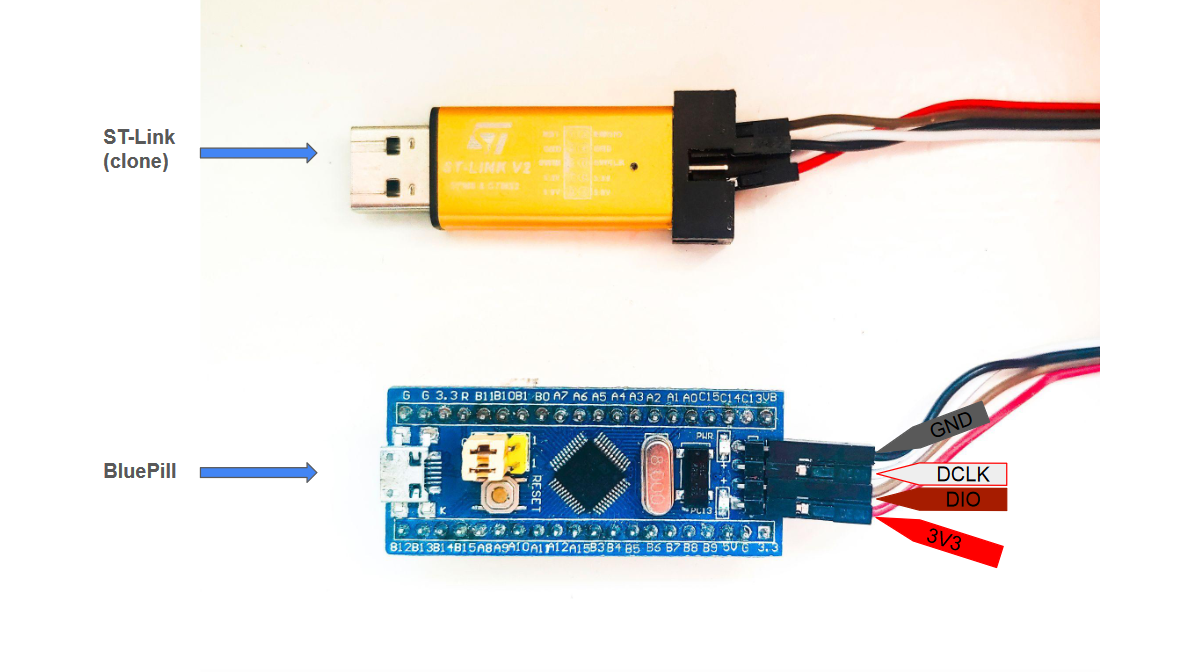
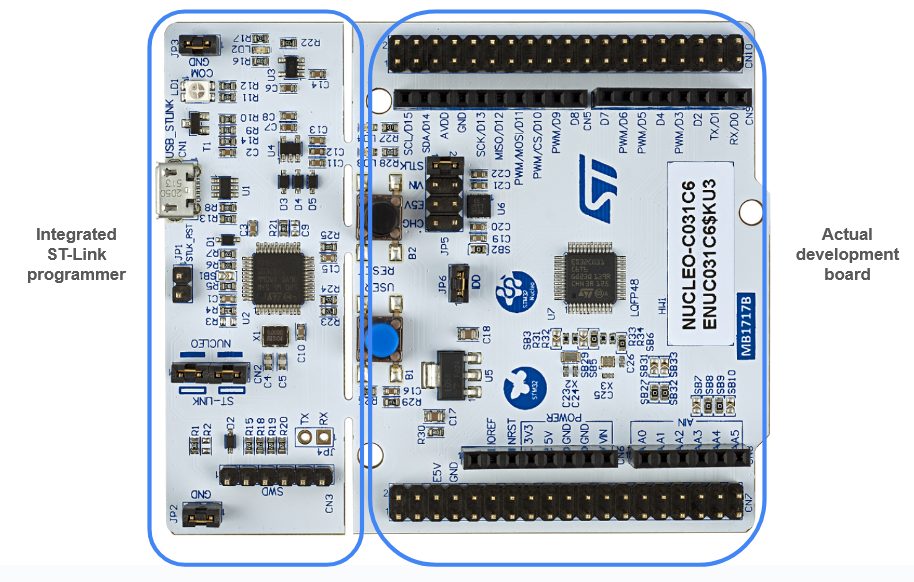
So the connection is done via SWD, and with this particular board, each wire is accessible. For reference, we just need the Data IO and Data Clock, as shown in the picture above. Other boards, like Nucleo series (in my lab at the time of writing I currently do experiment with the NUCLEO-C031C6), have the STLink integrated with the SWD already connected:
To install the driver, and note this is debugger specific, for the STLink you either need a complete install of the STM32 Cube IDE, or you need to install the driver from the official website.
The IDE configuration
As IDE the base is obviously VSCode. On top of it, is essentially needed one plugin, or extention, the “Cortex-Debug” from the VScode marketplace. So after starting VSCode (non admin priviledges are ok for now), we just need to click on the left (Extentions) or ctrl + shift + x, then type “Marus” or any keyword that includes the name or description, and the extention shown below will appears:

This extention allows to write the .json scripts needed to have the capacity to flash and debug our target MCU, and manage all the debugging part of the project.
In general, for our needs and for importing a project like in this example, is to import a folder as a workspace, by simply open a new VSCode instance, then drag&drop the folder to it:

Finally, before proceeding, we must also use the integrated terminal to keep everything easily aligned:

External Windows or other terminals can be used, but here for simplicity it will be all done with the integrated one in VSCode.
Now, let’s start to configure the project.
Setting up .json files
In order to parse correctly the paths to use OpenOCD with the Cortex-Debug plugin and have the debug option appear in the VSCode environment, three .json files need to be written. These must be put in the .vscode folder, which I create for any new workspace and will be project specific, and it has to be the first folder in the hierarchy. For example, in VSCode, when opening a new folder, in this example you can open aleaengineering_arm_makefiles_article (sources downloadable at the end) and the .vscode folder is under it, as follow:
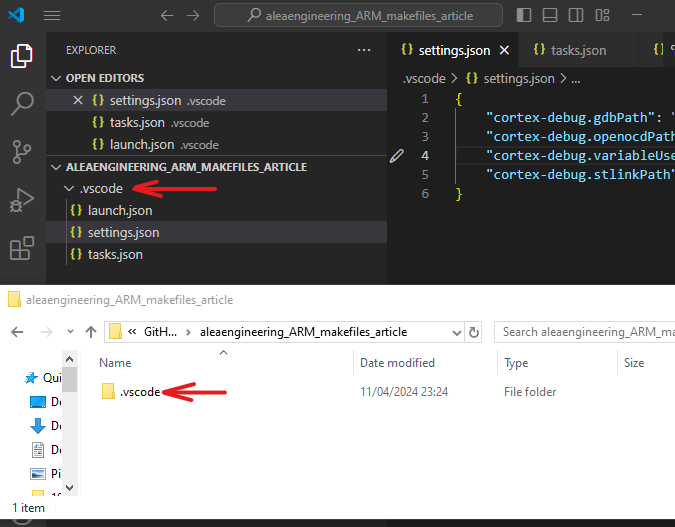
Writing the “settings.json”
This will be used to include the paths available to the Cortex-Debug plugin. Here will be set the path to the ARM GNU Debugger, the path to OpenOCD and eventually other debuggers one might want to use, for example the official ST-Link, here included as an alternative to make the example more complete showing that is possible to add any debugger. And it will be as follows:
{
    "cortex-debug.gdbPath": "C:/Program Files (x86)/Arm GNU Toolchain arm-none-eabi/13.2 Rel1/bin/arm-none-eabi-gdb.exe",
    "cortex-debug.openocdPath": "C:/ProgramData/chocolatey/lib/openocd/tools/install/bin/openocd.exe",
    "cortex-debug.variableUseNaturalFormat": true,
    "cortex-debug.stlinkPath": "C:/ST/STM32CubeIDE_1.13.2/STM32CubeIDE/plugins/com.st.stm32cube.ide.mcu.externaltools.stlink-gdb-server.win32_2.1.0.202305091550/tools/bin/ST-LINK_gdbserver.exe"

}
Dont’t forget the “launch.json”
One of the most important part is to instruct the Cortex-Debug which parameter use with the tools located in the previously set folders. In this case we are going to set various modes of the OpenOCD/STLink we are going to use. For example, if launching, attaching, interface, device etc. For a complete list, the wiki from the developer of Cortex-Debug is a great start.
Here I have set the OpenOCD and STLink. So for example, the OpenOCD configuration will expand to:
- Having the folder structure as in this example, the “${workspaceRoot}” will correctly point to our project files, hence “cwd”: “${workspaceRoot}” (today this is also replaceable with the “${workspaceFolder}” variable)
- Request is launch, so it will flash the binaries before each debug action
- For OpenOCD the servertype is self-explanatory
- It will run to main before stopping for debug
- Interface here is SWD, this is board/debugger dependent
- In this example we will use an STM32F103C8T MCU
- Config files are a must for OpenOCD as we must select the physical interface used (here stlink) and the target type (here stm32f1x)
Therefore the .json will look like:
{
    "version": "0.2.0",
    "configurations": [
        {
            "name": "STlink launch DEBUG",
            "cwd": "${workspaceRoot}/Src",
            "executable": "${workspaceRoot}/build/Debug/AleaExample.elf",
            "request": "launch",
            "type": "cortex-debug",
            "servertype": "stlink",
            "device": "STM32F103C8Tx",
            "showDevDebugOutput": "raw",
            "interface": "swd",
            "runToMain": true, // else it starts at reset handler - not interested
            // "preLaunchTask": "Build all", // configured in tasks.json
            // "preLaunchCommands": ["Build all"], // you can execute command instead of task
            "svdFile": "", // Include svd to watch device peripherals
            "swoConfig": {} // currently (v1.7.0) not supported
        },
        {
            "name": "openOCD launch DEBUG",
            "cwd": "${workspaceRoot}/Src",
            "executable": "${workspaceRoot}/build/Debug/AleaExample.elf",
            "request": "launch",
            "type": "cortex-debug",
            "servertype": "openocd",
            "runToEntryPoint": "main",
            "interface": "swd",
            "device": "STM32F103C8Tx",
            "showDevDebugOutput": "raw",
            "configFiles": [
                "C:/ProgramData/chocolatey/lib/openocd/tools/install/share/openocd/scripts/interface/stlink.cfg",
                "C:/ProgramData/chocolatey/lib/openocd/tools/install/share/openocd/scripts/target/stm32f1x.cfg"
            ]
        },
    ]
}
And there’s also the “tasks.json”
This is to integrate additional commands when using the launch.json, specifically when using the (now commented out) option of preLaunchCommands and preLaunchTasks.
For example, when is needed issuing a build before a compilation starts, by running automatically make. In this example I will not use it and run the compilation from the command line.
But here a snippet can be seen for reference on how it looks like:
{
    "version": "2.0.0",
    "tasks": [
        {
            "label": "Build all",
            "group": "build",
            "type": "shell",
            "command": "make",
            "args": ["all", "-j4"],
        }
    ]
}
Preparing a sample code
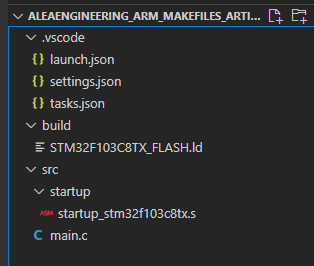
Now is time to actually put in the project some code to test the entire process. To do that an assembly startup file along with a main are placed in the project. I will use a basic division, in order to exercise and make visible later on the folder organization of CMake, using:
${workspaceRoot}/src/main.c -> obvioulsly the main file
${workspaceRoot}/src/startup/startup_stm32f103c8tx.s -> the startup file it will prepare for the main execution
${workspaceRoot}/build/STM32F103C8TX_FLASH.ld -> the linker file, which tells the compiler all the memory details of our microcontroller.
Note: don’t feel discouraged if the assembly and linker files seems complex. These files, except the <main.c> were taken from a working example for this microcontroller generated with the STM32 Cube MX, but can be reused and adapted accordingly.
More or less corresponding to the following:
Write a basic CMake file
This is the most complicated thing, especially if we need differnt folders, hence why the files separation. So after having worked on a bigger project using CMake, I kept the skeleton that will be important later in bigger projects. It looks more complicated, but will be way easier down the line as it gives scalability.
Here it is splitted in different files:
${workspaceRoot}/src/CMakeLists.txt -> it is the main CMake configuration, which merges together the other configurations in other subfolders (scalable CMake configuration is used)
${workspaceRoot}/src/startup/CMakeLists.txt -> it is the main CMake configuration used as an example to prepare the CMake information in a subfolder. The previous CMakeLists will take care of the libraries generated with this CMakeLists.
${workspaceRoot}/src/arm-none-eabi-gcc.cmake -> it is another hand written file containing informations specific to the compiler, making the CMakeLists more clean. Essentially, are defined all the path related to the compiler.

But here a quick breakdown of the main CMakeLists.txt, the one in the same folder of the main.c, as shown above. We have a first part, which contains all the compiler folder and output locations of the binaires. We are setting a default build type if not typed at invocation, it will access the arm-none-eabi-gcc.cmake, locate the linker file and enable the language settings desired:
# CMake template file

cmake_minimum_required(VERSION 3.15.3)

# Optional: print out extra messages to see what is going on. Comment it to have less verbose messages
set(CMAKE_VERBOSE_MAKEFILE ON)

# Path to toolchain file. This one has to be before 'project()' below
message(STATUS "CMAKE_SOURCE_DIR: ${CMAKE_SOURCE_DIR}")
set(CMAKE_TOOLCHAIN_FILE "${CMAKE_SOURCE_DIR}/arm-none-eabi-gcc.cmake")

# Setup project, output and linker file
# Check if CMAKE_BUILD_TYPE is not set or is empty
if(NOT CMAKE_BUILD_TYPE OR CMAKE_BUILD_TYPE STREQUAL "")
    # Set a default build type if none was specified
    set(CMAKE_BUILD_TYPE "Debug" CACHE STRING "Default build type: Debug" FORCE)
endif()

# Now, you can use CMAKE_BUILD_TYPE in your CMakeLists.txt
message(STATUS "Build type: ${CMAKE_BUILD_TYPE}")
set(BUILD_FOLDER "${CMAKE_SOURCE_DIR}/../build/${CMAKE_BUILD_TYPE}")

project(AleaExample)
set(EXECUTABLE "${PROJECT_NAME}.elf")
set(EXECUTABLE_OUTPUT_PATH "${CMAKE_SOURCE_DIR}/../build/${CMAKE_BUILD_TYPE}")
set(LINKER_FILE "${CMAKE_SOURCE_DIR}/../build/STM32F103C8TX_FLASH.ld")

enable_language(C ASM)
set(CMAKE_C_STANDARD 11)
set(CMAKE_C_STANDARD_REQUIRED ON)
set(CMAKE_C_EXTENSIONS ON)
The second part will set the project name, contains the folders with the other CMakeLists in which CMake will look into, then it will put together all the sources and libraries generated by the other CMakeLists to the the same project output executable:
include_directories("${CMAKE_SOURCE_DIR}/startup")
add_subdirectory("${CMAKE_SOURCE_DIR}/startup")


#List of main source file
set(SRC_FILES
"main.c"
)

file(GLOB AleaExample ${SRC_FILES})
add_executable(${EXECUTABLE} ${AleaExample})
Then it will setup the output files and debug information, which I always like to see clearly:
# Optional: Print executable size as part of the post build process
add_custom_command(TARGET ${EXECUTABLE}
        POST_BUILD
        COMMAND ${CMAKE_SIZE_UTIL} ${EXECUTABLE_OUTPUT_PATH}/${EXECUTABLE})

# Optional: Create hex, bin and S-Record files after the build
add_custom_command(TARGET ${EXECUTABLE}
        POST_BUILD
        COMMAND ${CMAKE_OBJCOPY} -O srec --srec-len=64 "${EXECUTABLE_OUTPUT_PATH}/${EXECUTABLE}" "${EXECUTABLE_OUTPUT_PATH}/${PROJECT_NAME}.s19"
        COMMAND ${CMAKE_OBJCOPY} -O ihex "${EXECUTABLE_OUTPUT_PATH}/${EXECUTABLE}" "${EXECUTABLE_OUTPUT_PATH}/${PROJECT_NAME}.hex"
        COMMAND ${CMAKE_OBJCOPY} -O binary "${EXECUTABLE_OUTPUT_PATH}/${EXECUTABLE}" "${EXECUTABLE_OUTPUT_PATH}/${PROJECT_NAME}.bin"
        )
The project can anyway freely explored in its sources downloadable at the end of the article. If needed, a specific article about CMake can be written, but here syntax is shown as a starting example to see how should be more or less structured a CMake based project. Despite I am not a CMake expert, it is a solid starting point for a more complex project which we developed in the past, which can be always improved over time.
A nice, complete and complex CMake project that can be use as an example of the most sophisticated CMake usage freely accessible, is the RP2040 SDK.
Invoking CMake and finally compile
Now that all is set in place, we must call the Makefile generation via CMake. This is done via command line and normally this steps required to be done only once, unless file structure changes! Here is used the internal VSCode terminal as shown before (just clicking Terminal->New Terminal), and is used here the PowerShell.
The CMakeLists uses absolute paths generation, therefore the CLI commands can be issues from anywhere, and the location of the main CMakeLists should be indicated, but beware that with this configuration, the output MAKEFILE will be generated where the command is issued from. So with this configuration, we have two options:
- In the src folder, issue, including the final dot:
cmake -DCMAKE_MAKE_PROGRAM=make -G "Unix Makefiles" . - Outside of the src folder, i.e. one level up, issue
cmake -DCMAKE_MAKE_PROGRAM=make -DCMAKE_TOOLCHAIN_FILE="arm-none-eabi-gcc.cmake" src - We can also select the build type explicitly, otherwise by default, with this configuration, will always be “Debug”. Hence we can use whatever, like
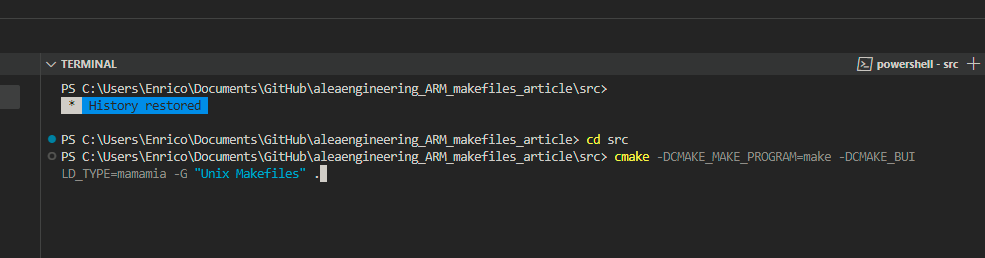
cmake -DCMAKE_MAKE_PROGRAM=make -DCMAKE_BUILD_TYPE=mamamia -G "Unix Makefiles"
In the option 2, the CMAKE_TOOLCHAIN_FILE must be explicitly set, otherwise it will use a default Windows compiler which obviously we don’t want, and the Makefile will be at a level up w.r.t. the src folder. If we use the option 3, before calling the command, we should be in the folowing position with the terminal:
After the correct invocation with option 3, the following structure, and the generated files, including the makefiles, are highlighted here:

Make it!
Finally the last step, calling make to compile our project. The call should be done wherever the Makefile is, in this case in the src folder.
In this case is sufficient to call make -j (it will use the CPU with the cores available more efficintly) or just make . This will output the binaries in the folder mamamia as follows:

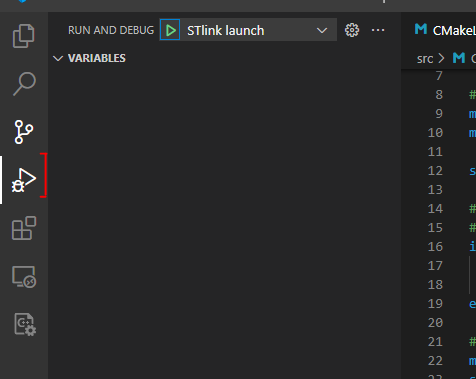
Aaaand… debug!
Now that we finally managed to generate binaries, we just need to connect the MCU with the debugger as shown above in the hardware configuration, then clicking on the “Run & Debug” on the left (of press ctrl + shift + d) and then on the green arrow, next to the “STlink launch”, which was previously configured in the .json files:
But with the “mamamia” build type used for learning reasons, we discover that the .json files are limited. They have hard coded paths. So to debug, I will re-run the steps with the “Debug” build type, instead of “mamamia” 😀
I always advocate to experiment a bit, because we just learned 2 new things by doing something odd, like using a weird build type name:
- To regenerate the output files accordingly, you might notice that most of the time you have to delete the CMakeCache.txt, or we will not see the correct build type folder appearing.
- The .json files and the build type can be written in a different, more structured way. We have the basic, but to structure all accordingly, it will be worth another article
Anyway, enough was written for now. After clicking the green arrow (Start Debugging) or pressing F5, we can enjoy the firmware running on our microcontroller!

Sources
As promised throughout the article, here you can find the reference project on GitHub:
https://github.com/thexeno/aleae-codebase/tree/main/aleaengineering_ARM_makefiles_article
